Podcast Editing Workflow: How Pros Do It
“`html
Professional Podcast Editing Workflow Steps: How B2B Pros Actually Do It
By Jose Villalobos
Most B2B podcasts die in post-production — not because the content is bad, but because the editing process is improvised every single episode. No consistency, no templates, no real system. Just someone opening Audacity and hoping for the best.
If you’re a CMO or founder investing in podcast content as a growth channel, that’s a problem. Your listeners notice choppy audio, awkward silences, and uneven volume levels faster than they’ll ever notice a weak hook. The fix isn’t hiring a better editor — it’s building a professional podcast editing workflow that runs the same way every time, regardless of who touches the file.
Here’s how production teams that do this at scale actually approach it — step by step, sin improvisación.
Why a Repeatable Workflow Is a B2B Growth Asset
Podcasting in B2B isn’t just content. It’s a relationship-building engine — with prospects, with partners, with the market you’re trying to influence. But that relationship breaks down the moment quality becomes inconsistent. A guest episode that sounds polished followed by a solo episode that sounds like it was recorded in a parking garage? That’s a trust problem, not just an audio problem.
A documented, repeatable editing workflow solves this. It reduces per-episode production time, makes it easier to onboard contractors or in-house editors, and ensures your brand sounds like itself — every single time. For teams publishing weekly or biweekly, that kind of operational discipline compounds fast.
Want to see how podcast production fits into a broader content system? our other related pillar“>Explore our pillar on B2B growth topics to see how leading teams connect content formats to pipeline.
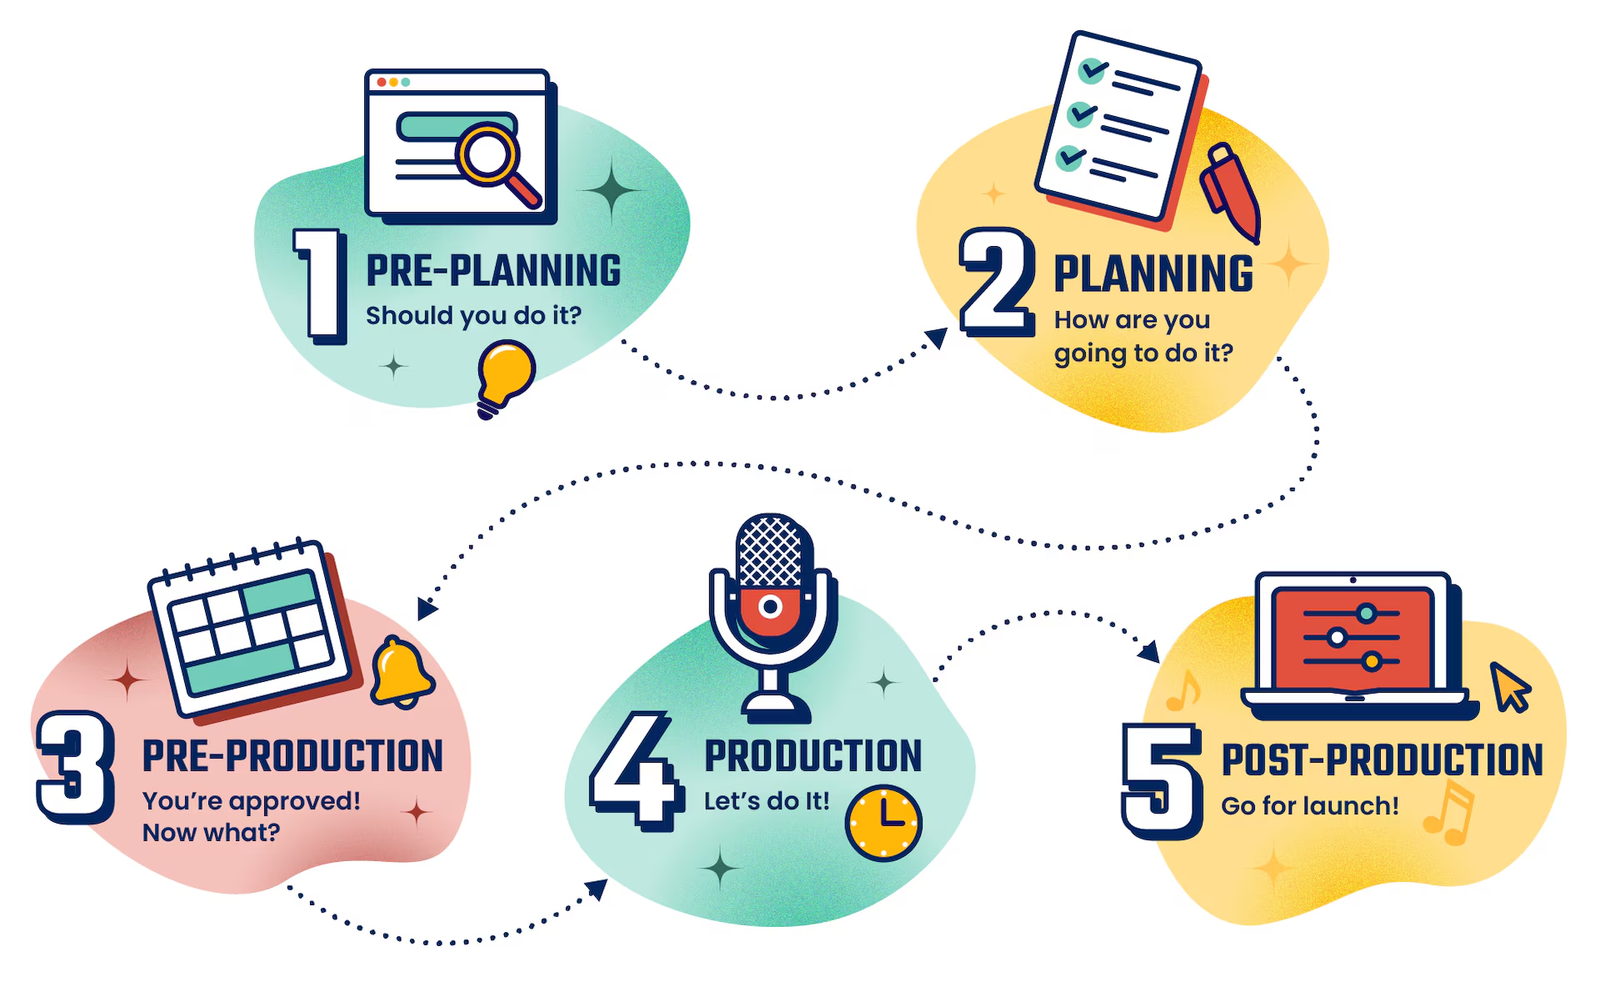
Step 1: Pre-Edit Planning — Before You Touch the File
The best podcast editors don’t start by opening a DAW. They start by understanding what a finished episode should accomplish. Is this a thought leadership solo episode? A guest interview optimized for clips? A co-hosted conversation with a regular segment structure? The editing decisions that follow — pacing, cuts, music cues — all flow from that answer.
Set episode-level goals first. Define the intended listener experience: should it feel conversational and raw, or tightly produced and branded? That guides how aggressively you edit filler words, long pauses, and tangents.
Organize your files before importing anything. Use a consistent folder structure: raw audio, assets (music, intros, outros), exports, and show notes. Name files with episode number, guest name, and date — not “final_v3_FINAL_USE THIS.mp3.” This sounds obvious. Muy pocos equipos lo hacen bien.
Build and maintain editing templates. Your DAW session should have pre-set tracks for host audio, guest audio, music bed, ads, and sound design. Import that template at the start of every episode. Don’t rebuild it from scratch each time.
Step 2: Raw Audio Review and Timestamp Logging
Before making a single cut, listen through the entire raw recording — or at minimum, skim it at 1.5x speed while taking notes. Log timestamps for anything that needs attention: technical issues, crosstalk, off-topic tangents, strong soundbite moments worth preserving, and natural segment breaks.
This step feels like it slows you down. It actually speeds everything up. Editors who skip the review pass end up making decisions reactively, missing good content, and over-editing sections that didn’t need it. A 10-minute review saves 30 minutes of rework.
What to flag during review:
- Background noise spikes or mic issues that need repair
- Long silences or dead air (anything over 1.5 seconds in most B2B formats)
- Filler word clusters (“um,” “like,” “you know”) that disrupt flow
- Repeated false starts or retakes
- Strong soundbites worth pulling for social clips
- Segment transitions that need music or a beat
Step 3: Structural Editing — The Heavy Cuts
This is where most of the real work happens. Structural editing means removing content that doesn’t serve the listener — not just cleaning up audio quality, but making decisions about what actually belongs in the episode.
Cut the false starts, the extended tangents, the five-minute off-topic detour about someone’s flight delay. In B2B podcasting, your listeners are executives and practitioners with genuine time constraints. A 45-minute episode that could have been 32 minutes tight is a decision to disrespect their attention. Claro que sí.
Key structural editing decisions:
- Remove full tangents that don’t connect back to the episode’s core topic
- Tighten the opening — most raw recordings have 2–4 minutes of warmup that listeners don’t need
- Trim guest answers that meander before landing on the actual insight
- Cut crosstalk and talking-over moments; keep the cleanest version of each thought
- Preserve natural laughs, pauses for effect, and conversational rhythm — don’t over-sanitize
Step 4: Audio Cleanup and Technical Processing
Once the structure is locked, address the technical audio quality. In 2026, listener expectations are higher than ever — AirPods, smart speakers, and car audio systems expose low-quality recordings instantly. There’s no hiding behind “we’re just a scrappy podcast” anymore if you’re using the show to build authority.
Noise reduction: Use tools like iZotope RX, Adobe Podcast Enhance, or built-in noise reduction in Audition or Reaper to remove consistent background hiss, HVAC noise, or room reverb. Apply subtly — heavy-handed noise reduction creates an unnatural, processed sound that’s equally distracting.
EQ: Boost presence in the 2–5kHz range for vocal clarity. Roll off low-end rumble below 80Hz. Each speaker’s track should be EQ’d individually — guest mics recorded over Zoom or Riverside will sound different from your studio mic and need separate treatment.
Compression: Even out dynamic range so quiet moments don’t disappear and loud moments don’t clip. A gentle ratio (2:1 or 3:1) with a medium attack preserves natural vocal dynamics while controlling spikes.
Volume leveling: All tracks should hit consistent loudness before mixing. Target -16 LUFS for stereo podcast files distributed to major platforms. Use a tool like Auphonic or your DAW’s built-in loudness normalization to verify the final export hits spec.
Step 5: Adding Music, Intros, and Branded Elements
This is where episodic consistency gets built. Your intro, outro, transition music, and ad breaks should be pulled from the same template every episode — not re-created, not improvised, not “I think we used this track last time.”
Intros: Keep branded intros under 30 seconds. Listeners already know the show; they don’t need a 90-second recap of what the podcast is about every episode. Get to the content fast.
Music beds and transitions: Use music to signal segment shifts, not to fill dead air. Set consistent in/out points so transitions feel intentional rather than slapped on.
Ad reads and sponsor spots: If the episode includes ads, edit them into natural conversation breaks — not mid-sentence. Dynamic ad insertion platforms handle placement automatically for many shows, but even then, your editing markers need to be placed correctly.
Step 6: Final Quality Check and Export
Never export the final file without listening to the processed version from start to finish — or at minimum, spot-checking key moments: the open, every transition, every ad break, and the close. Export errors, volume inconsistencies, and misaligned music cues show up in the final mix that didn’t exist in the edit session.
Final QC checklist:
- Loudness normalized to platform specs (-16 LUFS stereo, -19 LUFS mono)
- No clipping on peaks above -1 dBTP
- Intro and outro play correctly with proper fade timing
- Episode length matches expected runtime (flag significant deviations)
- File exported as MP3 at 128kbps minimum (192kbps preferred for music-heavy shows)
- Metadata embedded: episode title, episode number, show name, artwork
Step 7: Document, Iterate, and Improve the System
The final step most teams skip is the one that makes the workflow actually improve over time. After publishing each episode, log what went wrong, what took longer than expected, and what feedback came in about audio quality. Update your template, your checklist, your naming conventions.
A professional podcast editing workflow isn’t a document you write once and file away. It’s a living production system that gets sharper with each episode. Teams that treat it that way consistently produce better audio with less effort six months in than they managed in their first dozen episodes. That’s the compounding effect of process discipline.
Build the Workflow Before You Scale the Show
If you’re planning to increase publishing frequency, bring on a co-host, or distribute your show across more platforms in 2026, the time to nail your editing workflow is now — not after you’ve committed to a weekly cadence with inconsistent production.
The professional podcast editing workflow steps outlined here aren’t just for audio engineers. They’re for any B2B team serious about podcast content as a repeatable growth asset. Start with the template, lock the process, and let the system do the heavy lifting.
Want help building a podcast production system that actually scales with your team? our other related pillar“>See how Social Peak Media approaches B2B content production — or reach out directly and let’s talk about what your current workflow is missing.
“`